 "Putting It All Together" Binder
Now, armed with all the above knowledge from my pre-planning, I need to put it together as a resource. So, I created a travel binder.
To organize this binder and all my resource files, I have divided this entire journey into sections, such as Hoschton to Green Bay, Green Bay to Calgary, and Calgary to Fairbanks. Each major section has a specific code; for example, Hoschton to Green Bay is coded
GB## because Green Bay is the destination. Each section will have several overnight stops and sightseeing stops. For example, on the way to Green Bay, we will stop at St. Louis, MO, for a couple days of intense sightseeing. So, this first leg of the GB## journey is named “GB01_Hoschton to St. Louis.” The second leg of the journey would be St. Louis to Chicago and would be named "GB02_St. Louis to Chicago." Confused yet? The reason I have chosen to code the various legs of the journey is so that my computer files and computer-generated maps will list in the same order as my journey, and the pages within the binder will be easier to assemble.
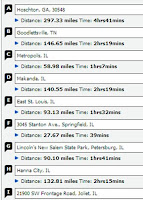
OK, so back to the binder. The next item after the calendar is a printout of a Yahoo Map I created for that leg of the journey (see
maps.yahoo.com). For each stop, Yahoo Maps provides the number of miles to get from City A to City B and the amount of time it will take for that drive. When you collapse the list of stops, it becomes a great overview for that portion of the journey. I created a screen capture of the route map and the list of stops. I pasted that capture into PowerPoint. I use PowerPoint because it is the easiest program to use when you have multiple elements that you want to manually move around on a page. I titled each group of slides (presentation) according to its code and added the starting and stopping points. I add city or attraction names on each slide within the presentation.
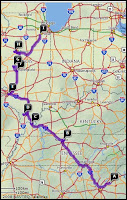
After the Yahoo Maps overview page, the next few pages are printouts of the “TripTik Overview Map with Directions” from AAA (see
www.aaasouth.com). Yes, I plot the trip and save it with its coded name in AAA’s online TripTik tool. It’s a wonderful tool, because you can zoom in and see all the travel items you might want to find, such as hotels, campgrounds, gas stations, specific addresses, and attractions. And here’s how I plot this tool. If we are just stopping on our journey to overnight at a city or if there is a single attraction along the route that we will quickly stop to visit, I select that destination (either city or attraction) and add it to My Trips in the AAA TripTik tool. The result is a nice plot of directions from one stop to the next. When I print out the Overview with Directions, it’s concise and comes with a mini-overview map. This overview has proven, on several previous trips, to be of great help when getting to a specific address or attraction.
The next group of printouts in the binder is descriptions of each campground we plan to stay at during that leg of the journey. Finding a campground has proven to be an arduous task. Not any one website seems to list all of the campgrounds that are available in a particular area or city. My resources are the websites of AAA, Good Sam Club (Trailer Life Directory), Woodall’s Directory, Passport America, and Camp Club USA. (
See the list of website at the end of this note.) I also check
www.RVparkreviews.com to read what other campers may say about a particular campground. (By the way, when I plot the Canada and Alaska treks, I also use The Milepost [a fantastic book that provides a milepost-to-milepost description of what’s along the way for every road that leads from Canada to the top of Alaska, including the Inside Passage cities). Before I make a final determination about a particular campground, I try to find that campground on the Web. If I do find their website, I copy a few pictures to provide a visual reference (and it lets me see if it truly might be a good place to stop). I paste those pictures onto a PowerPoint slide. On the front of the page I include in the binder is a printout of the campground description, as listed in one of my resources. On the reverse side of the page, I print out the campground pictures from my PowerPoint slide.
Behind each printout of a campsite selection, there may be several different types of printouts. For example, we plan to board the ferry in Prince Rupert, BC, after staying there for 2 nights. So, the reservations for the ferry are placed behind the campground printout for Prince Rupert. Another type of printout behind a campsite selection might be an attraction. Generally, we plan to see attractions the morning after we stay at a campsite. For example, we plan to stay in Petersburg, IL, and then go see Lincoln’s New Salem State Historical Park the next morning. Therefore, I would print out that attraction’s description and place it behind the Petersburg, IL, campground page. Now I know you are really fascinated by all this, so you might ask, “What’s an attraction printout?” Well, I’ll tell you.
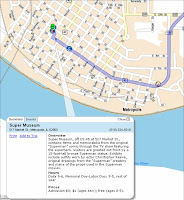
It keeps me from flipping pages and trying to find what I want to visit. I plot an attraction on the AAA TripTik website. On their website, each attraction is shown on a map with an “attraction” icon. When you select that attraction’s icon, a dialog box appears so that you can view the detailed description (including hours and prices) on the screen. I can add it to My Trip plan or just view it. If we only plan one or two stops for that city, I can add it to my TripTik plan. I move the dialog box so that it doesn’t cover up any streets that direct us to the attraction. When I place the dialog box where I want it, I create a screen capture. I then place this capture into the appropriate PowerPoint presentation (for that coded leg of the journey). I crop as needed and then print out that slide to include in the binder behind the campground’s printout.
If we plan to stay in a city for a few days and visit several attractions, I plot all of the attractions we’d like to visit on a city map in the AAA TripTik. I rearrange all the attractions into a “round-trip” plotted map for that city. I save this plot and printout AAA’s Overview Map with Directions for that city. I may create a zoom-in view of one or more attractions so that I have specific street map directions on how to arrive at the attraction. And, those zoom-in views are saved and cropped in PowerPoint as well.
In addition, AAA’s online TourBook provides a lot of history about various cities (especially the big cities). I sometimes print out that information and include it in the binder.
Why would I create a binder and go to all this trouble, you might ask? Good question. Well, my task on the journey is chief navigator. And, from experience it’s just impossible to maneuver several maps and TourBooks in the front seat of the car and crochet at the same time. So, with my binder, I have only one book to store and review. It’s all neatly arranged so that I can just flip through it as we drive (hence reducing the interruption time from my crocheting!!). I do have a state map handy for that day’s travel (I fold the map and place it into the back pocket of the binder). At night when we stop for the day, I update the state map, if necessary, for the next day’s leg of the journey. But, I do put the TourBook for that day and the appropriate maps in the car’s console—just in case I need to refer to them. In the Homey-Roamy, I have a drawer full of plotted maps and highlighted AAA TourBooks. I'm sure that's no surprise!
Well, if this information didn't tire and bore you, I don’t know what would. As you can see, I’m a travel agent in disguise.


